

The Impact of Part Orientation in 3D Printing on Strength, Accuracy, and Surface Finish
It may seem like a no-brainer to opt for the orientation that offers the minimum z-height, and thus the quickest build time. But, orienting solely for z-height may not always make the most sense in terms of your part requirements. There are a few other technical factors that come into play when thinking about part orientation for 3D printing. When you think about part orientation for 3D printing—specifically stereolithography (SLA)—think of a pencil. What would it take to 3D-print this pencil layer-by-layer either horizontally or vertically? Doing it horizontally would take less time, because it’s flatter when lying on its side, and printing it vertically would take substantially longer, because it’s standing tall and requires more drawn layers stacked sequentially one on top of another. Printing it horizontally would also require more support structures compared to printing the pencil vertically, and those would require additional time to remove to achieve a finished part. So, your orientation selection could come down to strength requirements or surface finish requirements for your pencil, and you may even want to orient your part at an angle. There are a handful of considerations when selecting stereolithography build orientation. Let’s get into it!
3D-printed Part Orientation for Strength
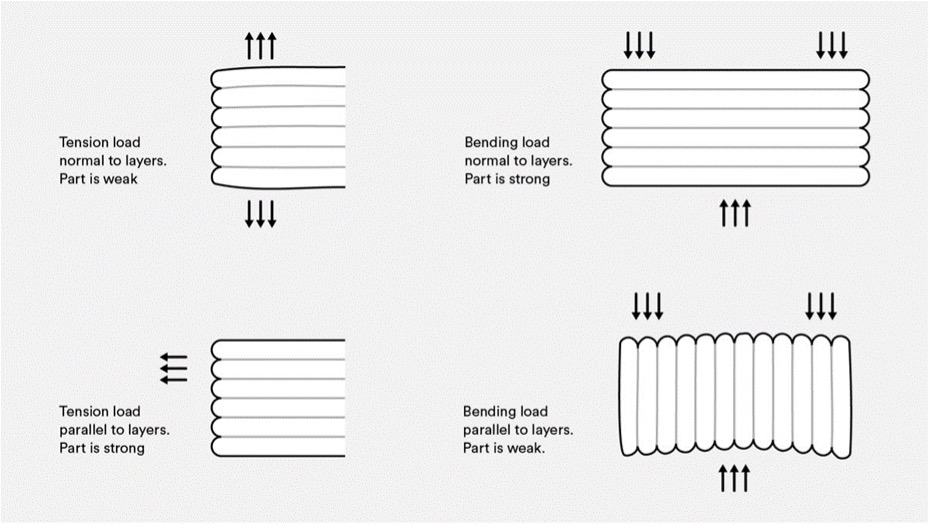
Let’s first look at a quick illustration that explains the general implications of 3d printing layer buildup and external part forces on parts. When tension forces are normal, or perpendicular, to the layers, part weakness tends to occur. When tension forces are parallel, or in line with the layers, the part is stronger. When forces are normal to the layers, the part is generally able to accommodate more compression than if forces are in line with the layers. Two takeaways apply:
- Print in an orientation so that layers align with the axis where tension forces are highest.
- Print in an orientation so that layers intersect the axis where compression forces are highest.
In the theoretical case of the pencil, a horizontal build orientation will likely work to account for the tension and bending forces the pencil will encounter when in use. Note that these guidelines always apply to Fused Deposition Modeling, (FDM) parts. SLA parts exhibit much less anisotropy than FDM parts because layers are chemically bonded, and the resolution achieved with SLA is much higher than with FDM. However, thermoset materials may require some additional thought around part orientation to maximize the strength of critical part features.
Orienting to Avoid Differential Shrink
 In general, the more uneven the distribution of material in a part, the more susceptible it is to differential shrinkage. Certain part geometries and sizes are inherently more prone to shrinkage because they are not adequately supported by the preceding layers of material. There are several options to prevent differential shrinkage. Typically, we manufacture SLA parts at an angle to reduce the surface area, which reduces the overall stress placed on each layer. This also helps improve the dimensional and tolerance accuracy of the part. Additionally, we manufacture parts in a lay-flat fashion, which creates each layer with the same surface area as the layer below it, without large cross-section fluctuations. When dimensionally critical or high-resolution part features are required, we recommend orienting the part so that these features are on the upward-facing surface of the part. Keep in mind that manufacturing parts at an angle may result in a less-than-ideal part surface finish if appearance is critical.
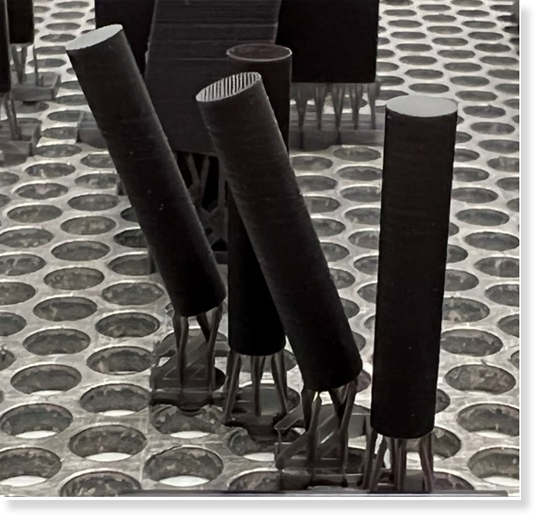 If smooth, cosmetic features are the goal, build parts vertically. Building at an angle will cause visible layer lines as shown on the angled cylinder.
As a rule of thumb, our team may choose a different orientation to provide you with the best quality part. One important thing to keep in mind is that if you don’t specify a desired part orientation (horizontal vs. vertical), we will automatically choose the orientation to meet the fastest possible build time. Letting us know what aspects are most vital to your 3D-printed parts helps us determine how best to orient your part during the build process. Overall, the biggest takeaway is that if you have a particular need for a 3D-printed part, whether it’s critical features, cost consideration, or a specific desired surface finish, be sure to let our team of engineers know in advance so we can ensure your part meets your specific goals.